Tasty Tangents

Food, life and other morsels

January 15, 2012
by admin
Comments Off on Post-Holiday Cheer

Post-Holiday Cheer

Cicitielli

Cicitielli

As always a few weeks after the Christmas season, things tend to get a little dreary as all the sparkle and joy begins to fade away.

So it seemed like and ideal time for my first guest post. My mom is always working to perfect family recipes. Ones that have been handed down on scraps of paper with little more than the names of a few main ingredients. (And that’s at the best of times.)

So without further ado…here’s a word from my mom.

ALL IN THE FAMILY

I have been wanting to write about my special Christmas sweets for quite some time. I remember the sights, smells and tastes that come with them, but most of all they represent my family’s traditions of preparing so many different sweets for the season that were made from recipes passed on from one generation to the next by word of mouth. The ingredients have always remained the same, but the quantities come from individual experience.

I made one particular sweet three times this season starting in late November when our family Christmas party was being organized by my sister, Lucy.  I was excited to have a big family gathering and wanted to bring tradition to the party with my sweets.

I took pictures of the process and felt very close to the people who made them before me.  I could hear my grandmother whispering “piano, piano,” (slowly, slowly) and knew she was watching over me while I deep fried them. I made them again within days because I thought they were too small and there weren’t enough.

The care and attention I gave them paid off.  They were magnificent.  After the frying and cooling, I made the icing and remembered how often I had watched my mom make them with the same care and the resulting cicitielli were always beautiful little balls of snow white icing adorning the fluffy cake inside.  Mom’s were the best.

I had come close to the way they were supposed to be and appreciated the hard work of those who made them before me.  I could feel their strength go through me and settle in my heart as I felt pride in having completed the job.

I made them again just before New Year’s Eve to bring them to my daughter’s house. They smelled, tasted and looked just like they were supposed to and I iced them at her house just before guests were supposed to arrive.

The work paid off because everyone who tasted them said they were surprised by the flavour and texture that they had.  They were not what they had expected and then they had another. I think that my son-in-law, Dan liked them a lot when he dipped one in the chocolate fondue.  He said that they were delicious.  My husband kept telling me that they were the best sweets of the season whenever he ate one.

I will probably not make them again until next Christmas and look forward to the event as part of the joys of the season, but I suppose I could make them some time before if I really wanted to.

October 17, 2011
by admin
Comments Off on Apple Cider Surprise Cookies

Apple Cider Surprise Cookies

Apple Cider Surprise Cookies

Apple Cider Surprise Cookies

They’re the perfect autumnal dessert (and a nice break from all the pumpkin). I used this recipe from The Cooking Photographer only substituting the apple cider mix with what was available.

Actually, for some reason I had a box of the stuff and haven’t used it in quite awhile and it turned out to be the perfect amount.

The whole wrapping a caramel in each cookie is a bit time consuming, but it’s totally worth it!

The cookies are definitely best served at room temperature or slightly warm so the caramel centers are soft.

Ingredients:
1 cup unsalted butter, softened
1 cup sugar
1/2 teaspoon salt
1 230 gram box Lynch’s Original Hot Apple Cider Mix
2 eggs
1 teaspoon vanilla extract
1 teaspoon baking soda
1/2 teaspoon baking powder
3 cups all-purpose flour
1 (14 ounce) bag Kraft Caramels (about 50 caramels)

Directions:

Preheat oven to 350F and line cookie sheets with parchment paper.

In a stand mixer, cream together butter, sugar, salt, and all packets of apple cider mix until smooth and fluffy. Beat in eggs and vanilla extract, then mix in the baking soda and baking powder. Add the flour and mix until just combined.

Use a standard cookie scoop to scoop the dough, scraping off the excess. Make an indent in the dough and place a caramel in the center. Work the dough around the caramel and roll the ball in your hand to seal well. Place the cookies two inches apart on the sheets.

Bake 12 to 14 minutes or until golden brown around the edges. After baking, carefully slide the parchment with the cookies onto the counter. Let cool until they are no longer soft but still slightly warm. Twist gently to remove, and cool the rest of the way upside down on the parchment or on a cooling rack.

Makes about four dozen cookies.

September 24, 2011
by admin
Comments Off on No-Bake Cookie Pops

No-Bake Cookie Pops

Chocolate Chip Cookie Dough and Oreo Cheesecake Cookie Pops

Chocolate Chip Cookie Dough and Oreo Cheesecake Cookie Pops

On a hot summer’s day I wanted chocolate chip cookies and I did not want to turn the oven on.  I had also seen  a recipe for no-bake oreo cheesecake pops that sounded fantastic.

On top of that, I had a new package of lollipop sticks ready to go, so I figured it was kismet. And it was also delicious. I guarantee you won’t regret making these quick recipes. I served them cold from the refrigerator though you could serve them frozen.

The first recipe for Chocolate Chip Cookie Dough Balls comes from Joy the Baker , but I made way more than the recipe claimed, about four dozen. My version is below. I only half dipped them in chocolate so I could see the yummy dough.

Chocolate Chip Cookie Dough Balls

1/2 cup unsalted butter (room temperature)
1 cup and 2 tablespoons all purpose flour
1/2 teaspoon baking soda
3/4 teaspoons salt
1/2 cup brown sugar
1/3 cup granulated sugar
1 teaspoon vanilla extract
1/3 cup peanut butter (or Greek yogurt or applesauce)
1 cup semi sweet chocolate chips
Lollipop sticks/popsicle sticks/plastic forks

Cream together butter and sugars until light and fluffy.  Beat in peanut butter along with the vanilla extract and stir to combine.

In a separate bowl whisk together the flour, baking soda and salt.  Add it all at once to the butter and sugar mixture and stir until incorporated.  Fold in chocolate chips.

Roll heaping tablespoonfuls onto wax paper lined cookie sheet and insert lollipop stick. Press in dough around stick to secure.

Freeze about three hours or overnight, until firm.

Dipping

Chop about 1 cup dark chocolate pastilles or semi-sweet baking chocolate and melt in double boiler or microwave (in 20 second increments). Dip balls and return to freezer to harden.  Serve cold from fridge or freezer.

Chocolate Chip Cookie Dough Pops - Undipped

Chocolate Chip Cookie Dough Pops - Undipped

The second recipe is from the blog Some Kitchen Stories.

Oreo Cheescake Pops

1 package of Oreos
8 oz packages of cream cheese, at room temperature
2 packages of semisweet baking chocolate (16 sq. total, for dipping)
Lollipop sticks

Put the Oreos in a bag and smash them into crumbs using a rolling pin or the bottom of a frying pan. Then combine the crumbs with the cream cheese in a mixer just until it’s well-blended.

Scoop out the mixture by the tablespoon and roll into little balls. Set them on a lined baking sheet coated with some cooking spray then stick in the lollipop sticks, a little more than halfway through, pressing the mixture around it.

Refrigerate for a couple of hours or overnight and then repeat the dipping process above. I dipped the dip in oreo crumbs, just for effect.

June 30, 2011
by admin
Comments Off on Cookies and Cream Cupcakes

Cookies and Cream Cupcakes

Cookies and Cream Cupcakes

Cookies and Cream Cupcakes

I’d heard about cupcakes with brownies in the middle, which I’d love to try, but I haven’t been able to find a good scratch recipe yet. They all seem to call for mixes, so let me know if you have one!

Instead I decided to try cupcakes with cookies in them, and I settled on this recipe from The Learning Channel.

There wasn’t anything complicated about the recipe, and it seemed like a nice, simple vanilla cupcake. I also found several similar recipes that had good reviews.

The only tweak I made was to chop the cookies instead of crushing them, as I liked the idea of having slightly larger chunks in the cupcakes.

For the decoration, I bought Mini Oreo Snack Packs and used Oreo Cookie crumbs that you would normally use for a pie crust.

All in all I think the cupcakes came out delicious, and they were a big hit. I was cursing my ‘non-convection’ oven as I baked, but there were no other major mishaps, and that to me is a successful baking adventure.

June 19, 2011
by admin
Comments Off on Cupcake Bouquets

Cupcake Bouquets

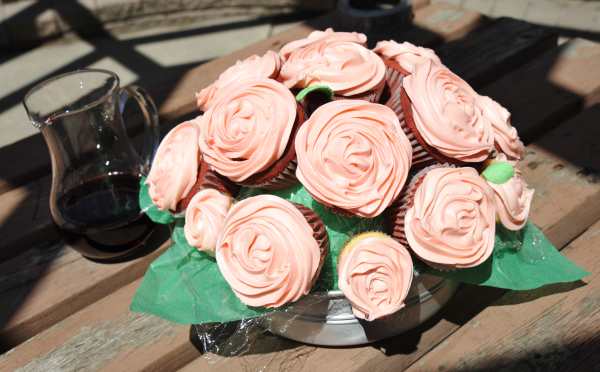
For Mother’s Day, I made two cupcake bouquets, one for each of the moms in my life. And just in time for Father’s Day, I thought I’d post one of the beautiful photos my dad took of one of the bouquets.

Cupcake Bouquet

Cupcake Bouquet

They’re a little time-consuming to make, but not nearly as tough as I thought it would be. Plus, the effect is pretty cool, everyone thought I was bringing over flowers, at least from a distance.

I read/watched a bunch of online tutorials and stories to help get me started. You can find some here, here and here.

You’ll need a base, preferably one with a little weight to it, and a styrofoam ball. I cut one in half to use it for both arrangements. I simply covered the foam with tissue paper and some plastic wrap to keep it from getting greasy, but you could also buy green styrofoam.

Once the foam is in the container, I started with the cupcake on top, and then made circles around it. Use whatever cupcakes you like (I made vanilla and red velvet, all with vanilla buttercream frosting), but it was really handy to have both regular and mini cupcakes to fill in the gaps.

I used two toothpicks per cupcake to hold them in place. Against the advice of all the guides I read, I waited until after the cupcakes were on the arrangement before I frosted anything. I have no idea how I would have placed already frosted cupcakes on there without making a mess.

The finishing touch was a couple of sugar leaves I had left over from another project and voila! Next time I’ll add more leaves and try to put the cupcakes closer together, but for my first attempt I was a happy camper.